To create claims to send to payers and plans for payment, you must first create charges for services. When charges are added to the service lines, use part 3 of the process to create claims.
1 Create Services |
2 Create Charges |
3 Create Claims |
Enter services for each client in Service Notes. |
An overnight batch process changes the status from Show to Complete, if there are no errors.
If there are errors, the status remains Show.
Correct the errors and re-process claims. |
When the charge has a status of Ready to Bill, you can create the claims for the charges to send to the appropriate payers and plans. |
The clinician signs the Note.
When the service note is signed, the system changes the status of the service note to Show. |
When the status is set to Complete, the status on the Service Details page for each service is changed to Ready to Bill. |
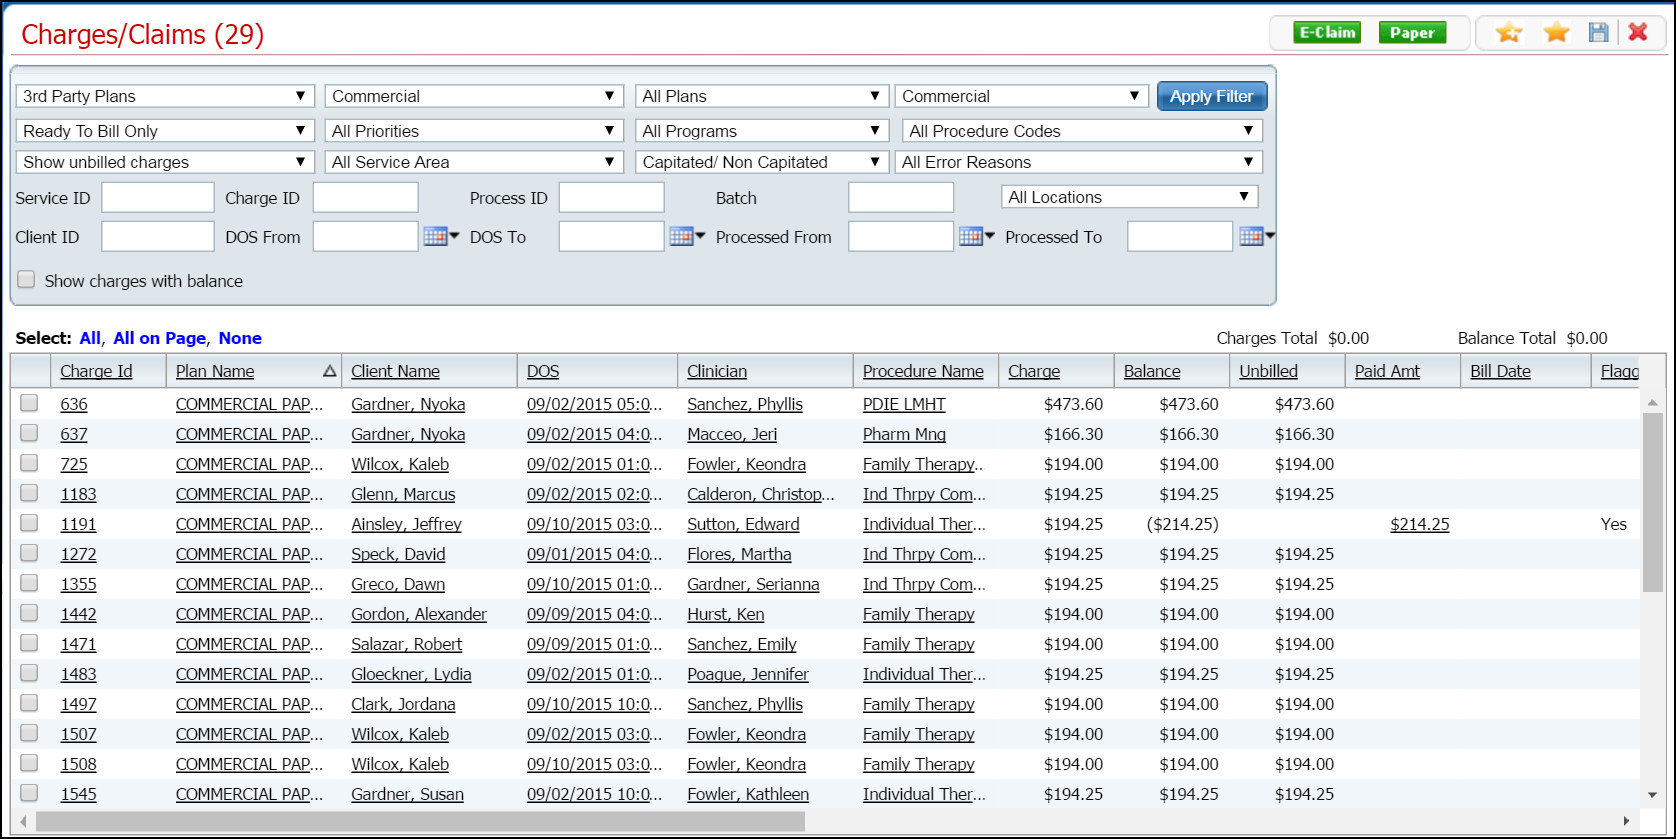
Access the Charges/Claims page and set the filter to Ready to Bill Only.
Select the E-claim button to create electronic claims to send to payers. -or- Select the Paper button to create paper claims to send to payers.
Select the charges to be billed.
Process the claims.
The status of the records are changed to Processed.
On the Client's account, the Unbilled Amount is changed to zero for this service line. |
This task includes:
Use this task to create claims to submit to payers.
Display the Charges/Claims (###) list page. Tell me how...
The Charges/Claims (###) list page is displayed. View field definitions.
Filter the list to determine the records that are displayed. Tell me how...
To create claims for all payers with charges owing on clients' accounts, leave the filter fields set to All. To create claims for a specific payer or plan, select the payer in the All Payers drop down or the plan in the All Plans drop down.
Set the All Charges drop down to Ready To Bill Only.
Select the dates of services to create claims for those services.
Click the Apply Filter button.
When the charges you selected are listed, select either:
· All charges
· All charges on page
· Select specific charges by select the check box on the record line
To create an electronic 837 claim file, click the E-Claim button to create an electronic 837 claim file to submit electronically to the payer. Continue with the next task, To Create an E-Claim.
-or-
To create paper claims, click the Paper button to to create paper forms to send to the payer. Continue with the next task, To Create Paper Claims.
When you click the E-Claim button in step 7 of the previous task, the Claims Processing window is displayed.
The Claims Processing window is displayed. View field definitions.
The service lines that are ready to be included in a claim file to the plan are listed.
All charges listed on the page will be included in the claims you create. You do not need to select the radio buttons to include a service line in a claim.
To remove charges from the list, click the radio button to the left of each service line you want to delete from a batch. Tell me how...
Make sure the Process Now radio button is selected.
When you are ready to create the claims, click the Process Now button.
All claims listed on the page are processed into claims, unless there is a problem with the service line, in which case the service line is excluded from the claim.
When the process is complete, a status message appears in the top left corner of the window. Refer to the red box in the figure below.
Verify that the Create Claim File button is activated and not grayed out. If the button is grayed out, scroll to the right on the lower panel in the window to find the Warnings/Errors column. Any text in this column indicates that there was a problem processing the charge into a claim.
If there is a warning or error message, troubleshoot the problem and fix it so you can reprocess the charge to create a claim. If you do not fix the warning or error problem, the charge will not be included on a claim to the payer. Tell me how...
When you click the Paper button in step 7 of the previous task, the Claims Processing window is displayed.
The Claims Processing window is displayed. View field definitions.
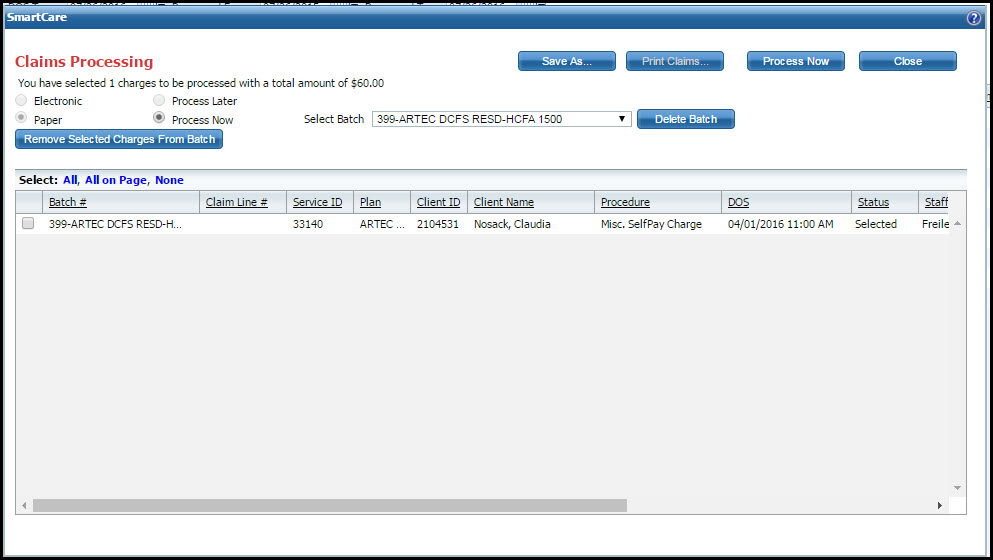
The service lines that are ready to be included in a claim file to the plan are listed.
All charges listed on the page will be included in the claims you create. You do not need to select the radio buttons to include a service line in a claim.
To remove charges from the list, click the radio button to the left of each service line you want to delete from a batch. Tell me how...
Make sure the Process Now radio button is selected.
When you are ready to create the claims, click the Process Now button.
All claims listed on the page are processed into claims, unless there is a problem with the service line, in which case the service line is excluded from the claim.
When the process is complete, a status message appears in the top left corner of the window.
Why can't I access these screens?